
Before you play a move, imagine the resulting position and ask what your opponent can capture. Inspect both the piece you moved and the pieces it stopped defending. This small change of viewpoint catches problems that staring at your own threat can miss.
In chess, a hanging piece is one that can be lost without adequate compensation. The simplest example is an undefended piece that an opponent can safely take. More complicated examples involve a defender that is pinned, overloaded, or needed to protect something more valuable.
Counting attackers and defenders helps you start the calculation. It does not finish it.
Key takeaways
- Check your opponent's captures in the position after your intended move.
- A defender may be present but unable to do the job you expect.
- Before taking a loose piece, check for a stronger forcing reply.
Separate “undefended” from “free to take”
An undefended piece has no friendly piece protecting its square. That fact alone does not prove that taking it is best. A capture can expose your king, allow a mating attack, or abandon a more valuable piece.
Likewise, a defended piece can still be vulnerable. If its only defender is a knight pinned to the king, that knight may be unable to recapture legally. If a queen protects two important targets, an opponent may be able to force it away from one.
If piece movement is still unfamiliar, keep the chess rules guide nearby. Use a two-part question: “Can I capture it?” and “What happens immediately afterward?” If the second answer is unclear, put the continuation on a board rather than counting material in your head and stopping.
Inspect the position your move creates
Try the following sequence during a slower practice game. An untimed computer game gives you room to run the check without racing a clock:
- Identify the opponent's most recent threat.
- Choose the move you want to play.
- Visualize the piece on its destination square.
- Look for enemy checks and captures in that new position.
- Inspect the squares your piece has stopped defending.
The fifth step is easy to miss. Moving a knight to safety may uncover a rook. Advancing a pawn may stop defending a bishop. Moving a king may leave a pawn unprotected while also changing which enemy moves are checks.
Start with positions containing an obvious capture or threat. You do not need to perform a full inventory of every square before every move. The immediate aim is to notice the specific tactical consequence of the move you are about to make.
Work through a queen that really is loose
Set up this legal sequence from the starting position:
[Event "A loose queen"]
[Result "*"]

1. e4 e5 2. Nf3 Qh4 3. Nxh4 *
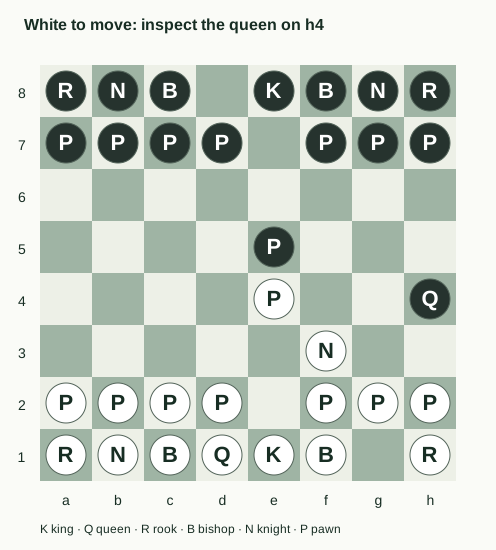
After 2...Qh4, White's knight on f3 attacks h4. 3.Nxh4 captures the black queen. The knight jumps directly to h4, so pieces on neighboring squares do not block its path.
Before reading the answer, ask which White pieces attack the queen's square. Do not assume that a queen move must be threatening. In this example, Black's queen has arrived on a square the knight can capture.
The position before the capture is:
rnb1kbnr/pppp1ppp/8/4p3/4P2q/5N2/PPPP1PPP/RNBQKB1R w KQkq - 2 3
White is not in check, and the capture is legal. Black cannot immediately recapture the knight on h4. This makes the example useful for learning to inspect the opponent's last move, rather than automatically continuing development.
Explain why a defender counts
When a piece appears defended, name the exact recapture you expect. “My bishop protects it” is incomplete. “If the rook captures on e4, my bishop can legally capture that rook on e4” is a claim you can verify.
Check three things:
| Question | What it protects against |
|---|---|
| Can the defender move legally? | Counting a piece pinned to its own king. |
| Is its path clear? | Counting a blocked bishop, rook, or queen. |
| What does the recapture abandon? | Missing a second threat against the king or another piece. |
Do not invent a pin simply because pieces line up. A pin to the king restricts legality; a pin to a queen may still allow a legal sacrifice. Put the actual continuation on the board and compare the consequences.
Diagnose the miss after the game
If you lose a piece, return to the position before the mistake. Decide which part failed: did you overlook the attacker, misread its movement, forget an opened line, or assume a recapture was legal?
Those errors call for different practice. Missing knight attacks suggests looking at knight destinations. Missing a bishop's diagonal suggests following that line square by square. Forgetting a defender moved away suggests examining what each move leaves behind.
Avoid treating every material loss as the same problem. A deliberate sacrifice that fails after a difficult variation is not identical to leaving a queen under a knight attack.
Use the broader blunder-checking routine when the mistake involves king safety or a forcing sequence rather than a simple loose piece.
Practise a cue, then check it in a new position
Repeat the queen example once without looking at the answer. Say “the knight on f3 attacks h4” before making the capture. Then look for a different loose-piece position in one of your finished games.
ChessStep's starter practice includes this queen-capture example. You can also save a highlighted position from a game review. The saved continuation is an exercise answer, not a promise that every other legal move loses.
Your next-game cue can be short: after the opponent moves, inspect what is now attacked or undefended; before you move, inspect what you leave behind.
Check the rule behind the example
The FIDE Laws of Chess, articles 3.6 and 3.9, describe knight movement and the restriction against leaving your king in check. Apply those rules to the actual board before deciding a capture is safe.