

To checkmate with a king and rook against a lone king, use the rook to cut off escape routes, bring your king closer, and drive the defending king to the edge. The final rook check works because your king covers the squares the opponent would otherwise escape to.
Imagine winning a rook, then spending the next several moves giving checks while the enemy king keeps returning to the center. You have enough material to win, but each check needs a purpose. Start by asking which part of the board you can take away.
1. Use the rook to make a boundary
A rook attacks along ranks and files. Place it on a line that separates the defending king from part of the board. For example, with Black's king on e6, a safe white rook on a4 controls the fourth rank. Black cannot cross that rank while the rook keeps controlling it.
That boundary buys your king time to approach. When you can safely move the boundary closer to the edge, the defending king has less room. Check the new square before moving: an unprotected rook next to the enemy king may simply be captured.
You do not need to check on every turn. A move that restricts the king can do more useful work than a check that lets it escape toward the center.
2. Bring your king into the ending
Your king controls adjacent squares and helps prevent the opponent from stepping back across the board. Move it toward the restricted king while keeping your rook safe.
The kings cannot occupy adjacent squares. If the opponent's king controls your intended destination, choose another route. This is why the rook's boundary matters: you can improve your king's position while the opponent remains on one side of it.
If moving the rook would release that boundary, consider a king move or a safe rook move along the same line. Recheck the position after Black replies; this method is a sequence of decisions rather than a fixed list of moves.
3. Recognize the rook and king checkmate pattern
Set up this position: White's king is on g6, White's rook on a1, and Black's king on h8. White moves.
7k/8/6K1/8/8/8/8/R7 w - - 0 1
1. Ra8# is checkmate. The rook checks along the eighth rank, taking away g8. White's king covers g7 and h7. Those are all the black king's neighboring squares on the board, and none is a legal escape.
The rook is far away from Black's king, so Black cannot capture it. Read the finish by naming the escape squares; the check alone does not explain why it is mate.
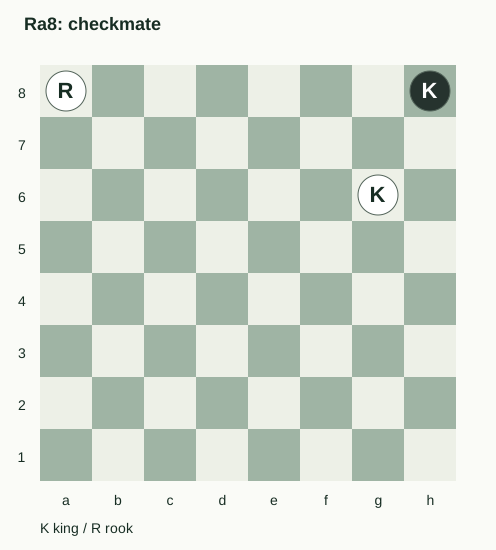
After Ra8#: Black is in check and has no legal escape.
4. How to avoid stalemate in a king and rook ending
Even a king-and-rook ending can become a draw through stalemate. Here is a separate position: White's king is on f7, White's rook on g5, and Black's king on h8. White moves.
7k/5K2/8/6R1/8/8/8/8 w - - 0 1
After 1. Rg7?, Black is not in check, but has no legal move. White's king controls g8 and g7; the rook controls h7. The game is drawn immediately.
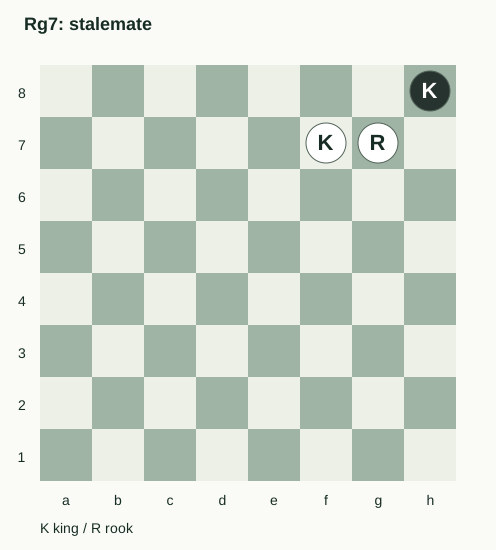
After Rg7?: no legal move without check means stalemate.
The distinction comes from the FIDE Laws of Chess: article 5.1.1 describes checkmate, while article 5.2.1 defines stalemate. Before a quiet move near the edge, ask whether the defending king will still have a legal square.
Practice against a defending king
Open king and rook endgame practice. Use the rook to establish a boundary, then bring your king closer. The defending engine replies after your moves, so you can practice adapting when the king changes direction.
If you get stuck, use a hint or take back a move. Before trying again, identify what changed: did you loosen the boundary, expose the rook, or remove Black's last legal move without giving check?
You can also review a finished game and find the position where the ending became difficult. Practice the complete ending in the endgame trainer; a saved single-position retry checks a stored continuation rather than playing the whole ending through.