
Use the queen to restrict the opposing king, bring your own king close enough to support the finish, and check the defender's legal moves before every quiet queen move. Having a queen is not the same as having checkmate. If the defender has no legal move and is not in check, the result is stalemate.
That final distinction is where a winning material advantage can disappear. It also shows why finding a tactical answer and finishing a game are different tasks: you may win a queen or simplify into a winning ending and still need a plan.
This guide uses a king and queen against a lone king. Try the diagrams on a physical board, then use the queen endgame trainer to practice finishing against Stockfish. You play White; the engine plays Black.
Key takeaways
- Checkmate requires check and no legal escape.
- Stalemate requires no legal move and no check.
- Restrict the king without trapping it prematurely, then coordinate queen and king.
Check the rule before checking the technique
The FIDE Laws of Chess define checkmate in article 1.4 and stalemate in article 5.2.1. Stalemate is a draw, even if one side has a large material advantage.
In this ending, the defender has only king moves available. Before playing a quiet move, ask whether at least one legal king move will remain. After a checking move, ask whether every legal response to the check has been eliminated.
Do not confuse “the king cannot move” with checkmate. That description omits whether the king is attacked, which is the decisive difference.
Compare these two positions
In both diagrams, it is Black to move. The black king is on h8 and the white king is on f6. Only the white queen's square changes.
| Position | White queen | Is h8 attacked? | Result |
|---|---|---|---|
| A | g6 | No | Stalemate. |
| B | g7 | Yes, along the diagonal | Checkmate. |
Position A:
7k/8/5KQ1/8/8/8/8/8 b - - 0 1
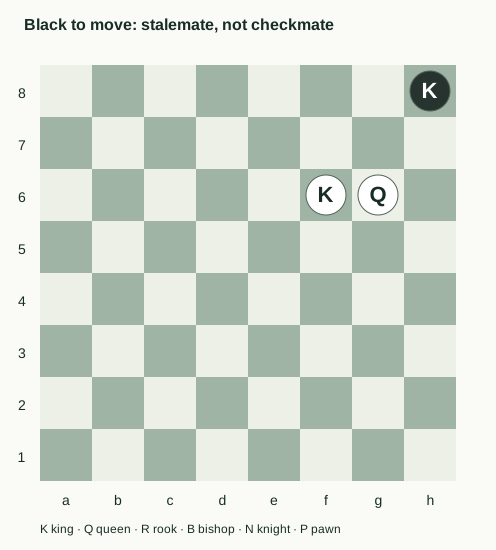
With the queen on g6, Black cannot go to g8 because the queen attacks the g-file. The queen also attacks h7 diagonally and g7 vertically. Black's king is not currently in check on h8, so the lack of a legal move produces stalemate.
Position B:
7k/6Q1/5K2/8/8/8/8/8 b - - 0 1
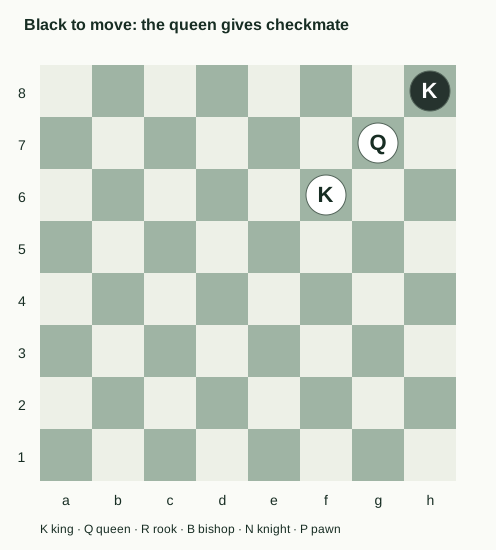
Now the queen on g7 attacks h8. It controls g8 and h7 as well. Black cannot capture the queen on g7 because White's king on f6 protects that square. There is no legal answer to the check, so the position is checkmate.
The difference is visible without an evaluation bar. Name the attacked squares and verify whether the king is checked.
Practice a safe final move
Set up this position with White to move: White king f6, White queen g5, Black king h8.
7k/8/5K2/6Q1/8/8/8/8 w - - 0 1
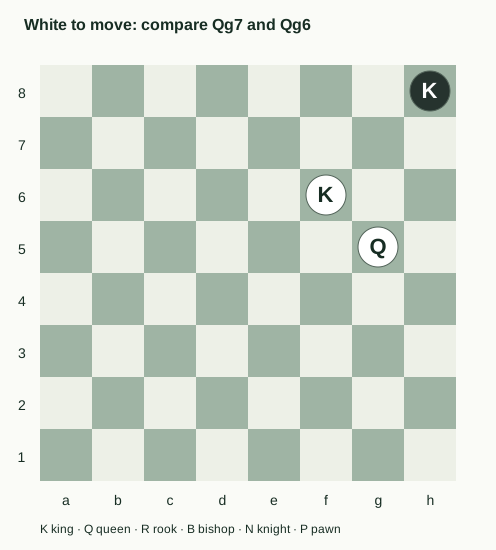
The move Qg7# gives the checkmate described above. The queen travels up the g-file through g6 to g7, where it is protected by the white king.
The tempting Qg6? instead creates Position A with Black to move. It is immediately stalemate. The queen is safe and the material advantage is unchanged, yet the game is drawn because the defender is not in check and cannot move.
Try both moves on the board. After each, answer the same two questions: is the king in check, and which legal moves are available? This is a stronger exercise than memorizing “put the queen near the king.”
Build the finish by reducing space
Away from the final position, use the queen's rank and file control to limit the defender's available area. Keep the queen safe, and avoid placing it where the enemy king can capture it. A queen that is close to the defender often needs support or careful distance.
Once the defender is restricted, use your king to help control escape squares and support the queen. Kings cannot move next to each other. Your king's role is to approach legally and cover useful squares, not to chase the opponent without a plan.
When the defender reaches the edge, stop shrinking its space automatically. Recheck its legal moves. You may need a king move to prepare the mating arrangement while leaving the defender a square, rather than another queen move that removes its last option.
This is a practical framework, not a memorized move sequence for every starting position. The defender's choices determine how you continue.
Use a board exercise with a clear stopping rule
Begin with the mate-in-one position above. Then move White's king farther away while keeping the initial setup legal and neither side in an impossible check. Try to bring the king into the finish while maintaining a safe queen and avoiding stalemate.
After each White move, choose a legal defense for Black. If you are practicing alone, do not always choose the move that helps your planned mate. Look for squares that preserve space or attack an unprotected queen.
Stop and inspect the position whenever Black has no legal move. Decide whether it is mate or stalemate before starting again. For now, prioritize correct conversion over a personal speed record.
Carry the lesson back to your games
When a finished game reaches a queen ending, replay the moment when the defender's space became small. Identify whether the next move should restrict the king further or bring your own king into play.
You can import that finished game for review, but the current saved-position practice checks a single stored continuation. It does not continue the entire ending against a defending engine. Use the dedicated endgame trainer for a complete ending against Stockfish. It includes hints, takebacks, and saved game history; it is separate from retrying a single position in your notebook.
The essential habit is concrete: before removing the defender's final square, make sure your move also gives check. A winning position still has to become a legal checkmate.
Review a missed finish
For an ending from your own game, use the one-lesson review routine. If you only have a downloaded file, the PGN import guide explains how to open it.